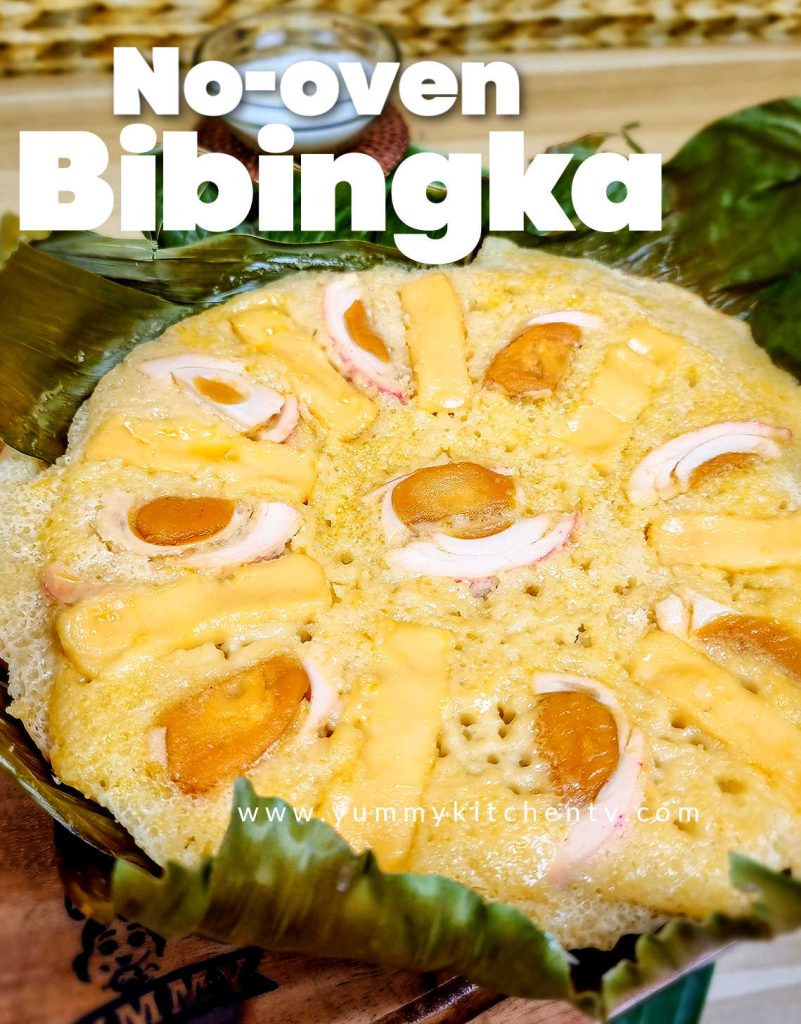
No Oven Bibingka
No-oven Bibingka is soft and fluffy Filipino pastry that are commonly sold outside churches during the Simbang gabi, but instead of baking, this recipe requires no oven! This bibingka recipe has a comparable taste to a thick pancake, but enhanced with the flavor of margarine and cheese and the aroma of the banana leaves which holds it. This yellow fluffy bread is traditionally created in mini grillers where both top and bottom to cook them evenly. This recipe will show you how to make no oven bibingka, where you don’t need extra grillers, just your regular pan.

NO OVEN BIBINGKA RECIPE
Ingredients:
- 1 1/2 cups rice flour
- 2 cups coconut milk
- 1/2 cup all purpose flour
- 1 tablespoon baking powder
- 3 pieces eggs
- 1/4 cup melted butter or margarine
- 1 cup white sugar
- 2 tablespoons grated cheese
- Extra cheese
- Salted eggs (sliced)
Directions:
- Prepare a large bowl and then sift the rice flour, all purpose flour and baking powder. Mix well.
- On a separate bowl, crack the eggs and beat them. Add the white sugar and mix until well dissolved. Add the coconut milk (you may use evaporated milk or fresh milk as substitute) and mix thoroughly. Lastly, add the melted butter and mix well.
- Pour the wet mixture into the flour mixture. Mix thoroughly for a few minutes until there are no lumps. Add the grated cheese and stir a little to distribute into the bibingka mixture.
- Lay some banana leaves on a pan. Press them a little to resemble a round shape. Gently pour the bibingka batter onto the lined pan. Cover the pot and let it cook for 30 to 40 minutes using low heat.
- A few minutes before the top part completely cooks, add slices of cheese and sliced salted eggs for toppings. Cover the pot again to cook the bibingka fully. Brush the top with some melted butter or margarine.
- Dip a thin stick up to the center of the bibingka. If the stick came out clean, then the bibingka is ready.
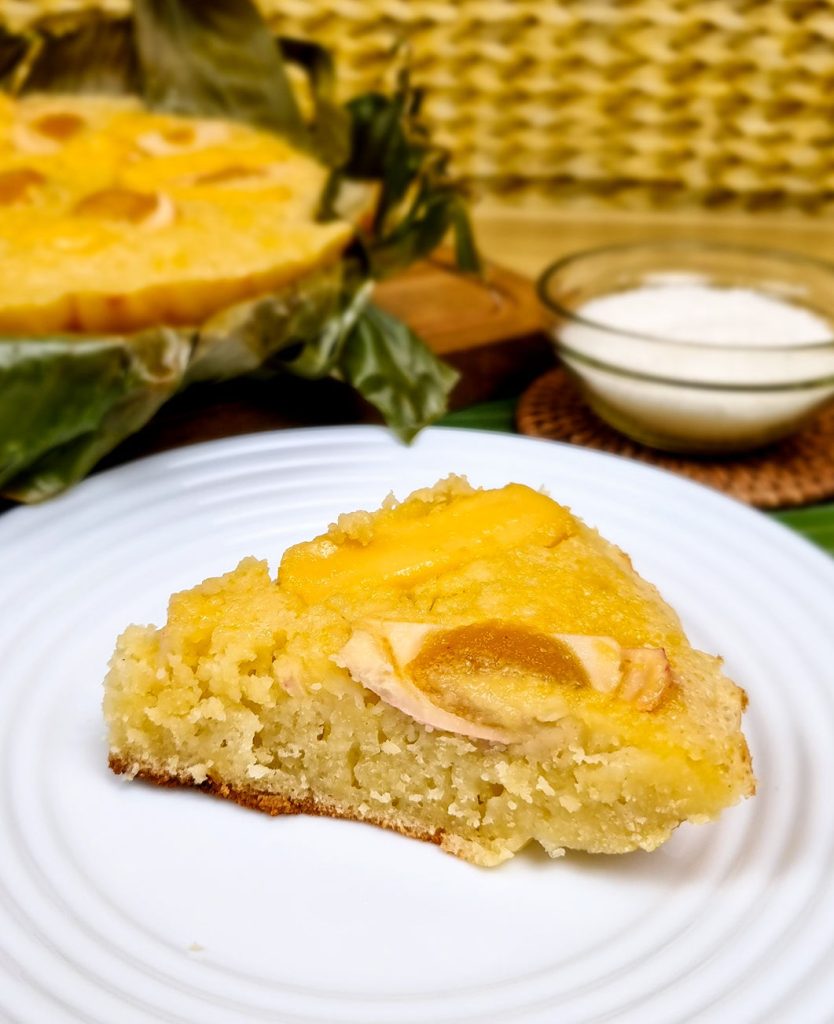
- Transfer the bibingka into a serving plate. Slice them into serving portions and enjoy with your favorite coffee or tea. Yum!
What is Bibingka
If there’s an OG Filipino type of cake, that would probably be bibingka. There is still an argument whether the bibingka originate from Indonesia or from the Philippines, but there is no question asked on who among the two enjoyed it more.
Bibingka is commonly sold outside of chuches during the simbang gabi and is cooked alongside the puto bungbong.The most fascinating thing about the bibingka is its way of cooking, where after pouring it in a mold lined with banana leaves, hot terracota with charcoal is placed on the top and bottom of the batter to cook both sides evenly at the same time. This yellow fluffy bread is finished by brushing some softened butter and sprinkling some grated cheese and sugar.
Since the bibingka is made with rice flour, it is also considered as a kakanin. Other types of bibingka includes bibingkang galapon, bibingkang malagkit and bibingkang kamoteng kahoy.
Have you ever craved for a food after listening to a song? Merienda time is fast approaching and I still haven’t thought on what to prepare. I put on the OPM playlist on my Spotify to help me think of a merienda. I was really glad I chose that playlist because the first song which played was “Bibingka” by Ben & Ben.

No-oven Bibingka
Although the Christmas season had just passed, the spirit of Christmas will always be here. I’m actually alone at my apartment today but the spirit of gift-giving never stops. Instead of making a small bibingka just for myself, I prepared a giant bibingka, which almost resembles a real cake, and shared some of the slices with the kids playing in front of my unit. If you wanna share some love, share some bibingka today!
If you wanna know how to make a no oven bibingka at home, read and follow the quick steps below. Happy cooking!
How to Make No-oven Bibingka
If you have observed how the bibingkas are cooked outside of churches during the simbang gabi, then you’ll already have an idea how easy to make this fluffy snack. Instead of thinking on how to improvise the small griller used by bibingka makers outside churches, this recipe will show you how to make it quicker and without the use of special equipment. Prepare to be amazed as we cook some bibingka using your regular pan.
The first step in making a bibingka is to make the batter. If you have tried making a pancake batter in the past then the steps will be similar to you. But the specific ingredient which highly differentiates the kakanin to a pancake is the use of rice flour. On a large bowl, compare the dry ingredients first. I sift them at least once to make sure that the risk of lumping later will be lower. Sifting is like “combing” the dry ingredients.
On the second bowl, add and combine the wet ingredients. Take note that sugar is considered as a wet ingredient for this type of recipe. Then, combine all the ingredients together and the grated cheese. You may also pass the batter to a strainer (before adding the cheese) to make sure that the batter is smooth and not lumpy. Lumps will give raw flour taste.
Now, the best part, grab your pan and lay a large piece of wilted banana leaves. Instead of making small bibingka, we are making a large one, almost similar to a cake. Then, cover the pot to let the bibingka cook. If the lid of the pan is getting moisty, you can dress it up with a cloth. The cooking time will take around 30 o 40 minutes. Extra time will be needed if your bibingka is thicker than 2 inches.
Just like when making a cake, use a stick or toothpick to check if the internal part of the bibingka is cooked. When the stick is clean, then it is almost cooked. Brush the top with soft margarine and add some thin slices of cheese (or grated cheese). You may also sprinkle some sugar if you like.
Your giant bibingka is now done. You can easily pop the cake out of the pan by gently pulling the banana leaves. Slice the bibing-cake into portion sizes. I love having them as an afternoon snack alongside my sweet coffee or tea. Yum!


No Oven Bibingka
4
servingsIngredients
1 1/2 cups rice flour
2 cups coconut milk
1/2 cup all purpose flour
1 tablespoon baking powder
3 pieces eggs
1/4 cup melted butter or margarine
1 cup white sugar
2 tablespoons grated cheese
Extra cheese
Salted eggs (sliced)
Directions
- Prepare a large bowl and then sift the rice flour, all purpose flour and baking powder. Mix well.
- On a separate bowl, crack the eggs and beat them. Add the white sugar and mix until well dissolved. Add the coconut milk (you may use evaporated milk or fresh milk as substitute) and mix thoroughly. Lastly, add the melted butter and mix well.
- Pour the wet mixture into the flour mixture. Mix thoroughly for a few minutes until there are no lumps. Add the grated cheese and stir a little to distribute into the bibingka mixture.
- Lay some banana leaves on a pan. Press them a little to resemble a round shape. Gently pour the bibingka batter onto the lined pan. Cover the pot and let it cook for 30 to 40 minutes using low heat.
- few minutes before the top part completely cooks, add slices of cheese and sliced salted eggs for toppings. Cover the pot again to cook the bibingka fully. Brush the top with some melted butter or margarine.
- Dip a thin stick up to the center of the bibingka. If the stick came out clean, then the bibingka is ready.
- Transfer the bibingka into a serving plate. Slice them into serving portions and enjoy with your favorite coffee or tea. Yum!